Free kits
Free AI kits
The setups I use to save hours. Built on great open work, with my own presets and rules added on top.
Video
Animation Kit
Make short animated clips from one prompt. Every frame is drawn in code, so nothing here is AI video.
What this kit is
Lemo-Opuscar is a library of 66 film styles: satellite briefing, silkscreen poster, risograph, living screencast, isometric infographic, watercolor, ukiyo-e and more. Each style is a written style guide plus one demo film.
The part that surprised me: nothing here is AI-generated video. Every frame is drawn by code. The agent reads the style guide, writes the drawing code, the camera moves, the music and the sound effects, and the kit renders it frame by frame into an mp4. So a clip is exact, repeatable, and you can go back and edit it.
Lemo-Opuscar is made by Lemomo: github.com/lemomo-ai/lemo-opuscar
How to set it up (about 15 minutes, one time)
What you need: a Mac or Windows computer and a paid Claude plan (Pro or above). Claude Code installs anything else the kit needs.
Step 1
Install Claude Code
Open Terminal and paste the command for your computer.
Maccurl -fsSL https://claude.ai/install.sh | bash
Windows (PowerShell)irm https://claude.ai/install.ps1 | iex
Full guide: code.claude.com/docs/en/quickstart. To check it worked, type
claudeand press Enter.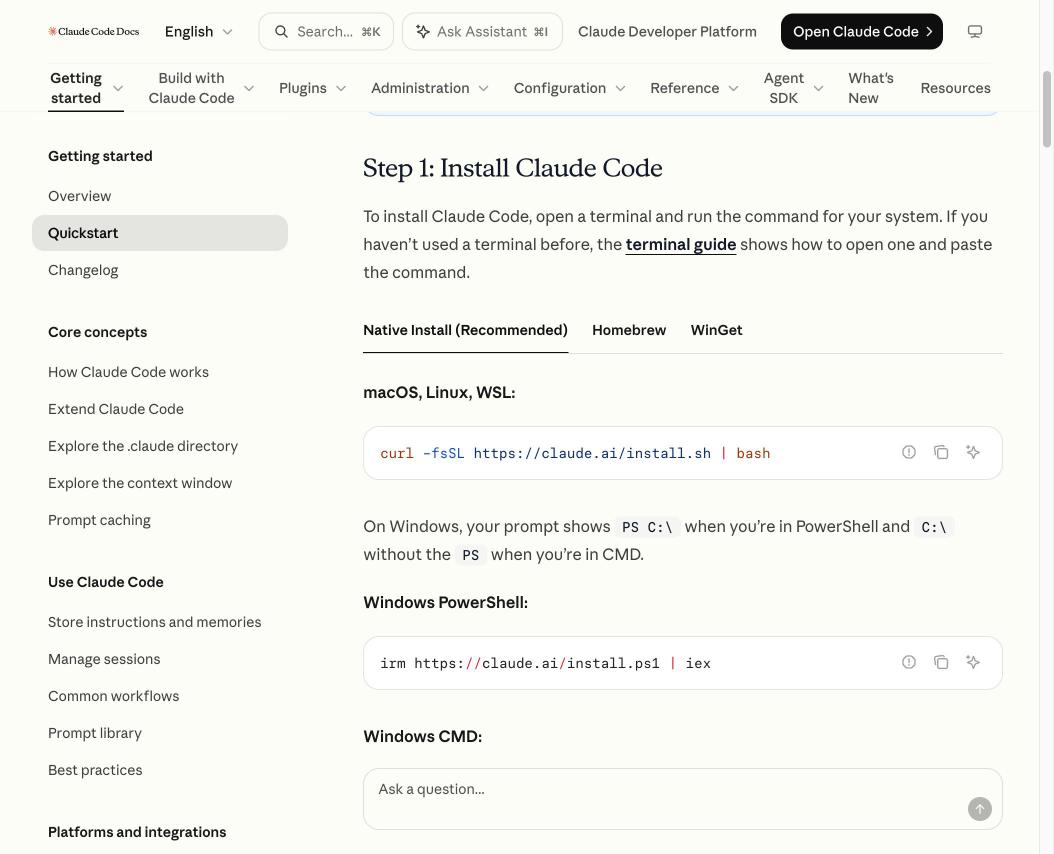
Step 2
Download the kit
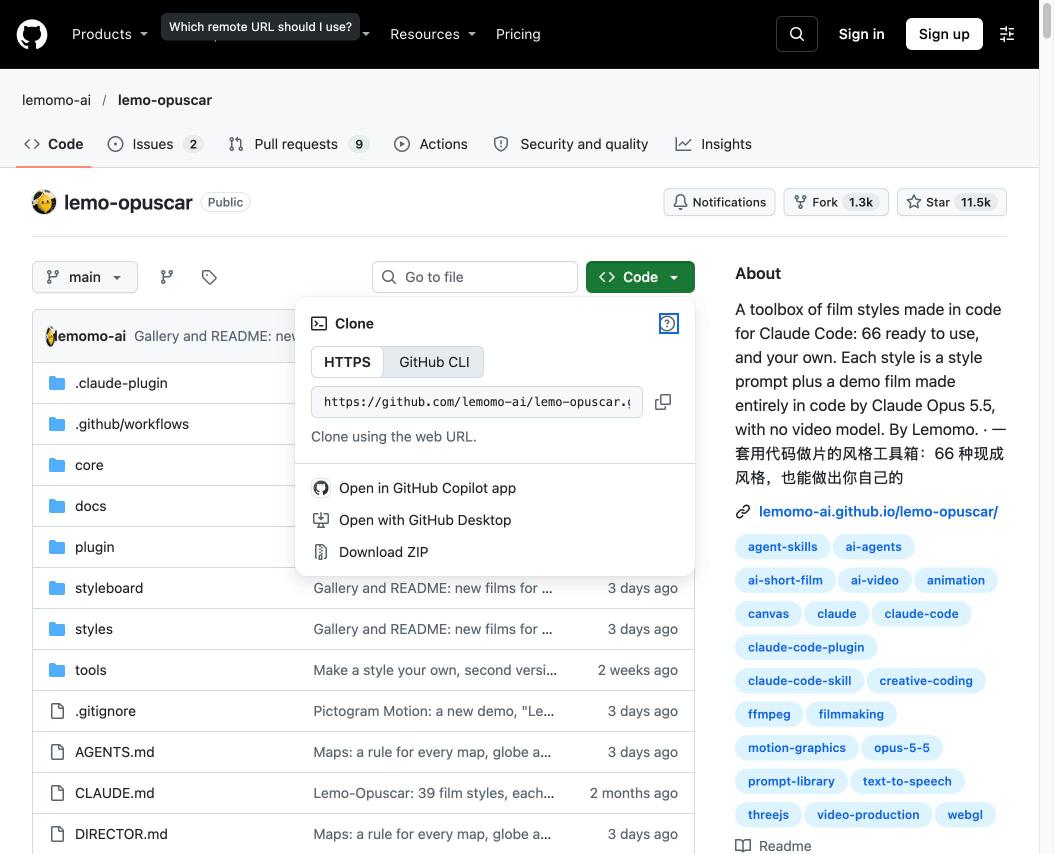
Open github.com/lemomo-ai/lemo-opuscar, click the green Code button, then Download ZIP, and unzip it.
Tip: move the folder out of Downloads and into your home folder.
Step 3
Open Terminal inside the kit folder
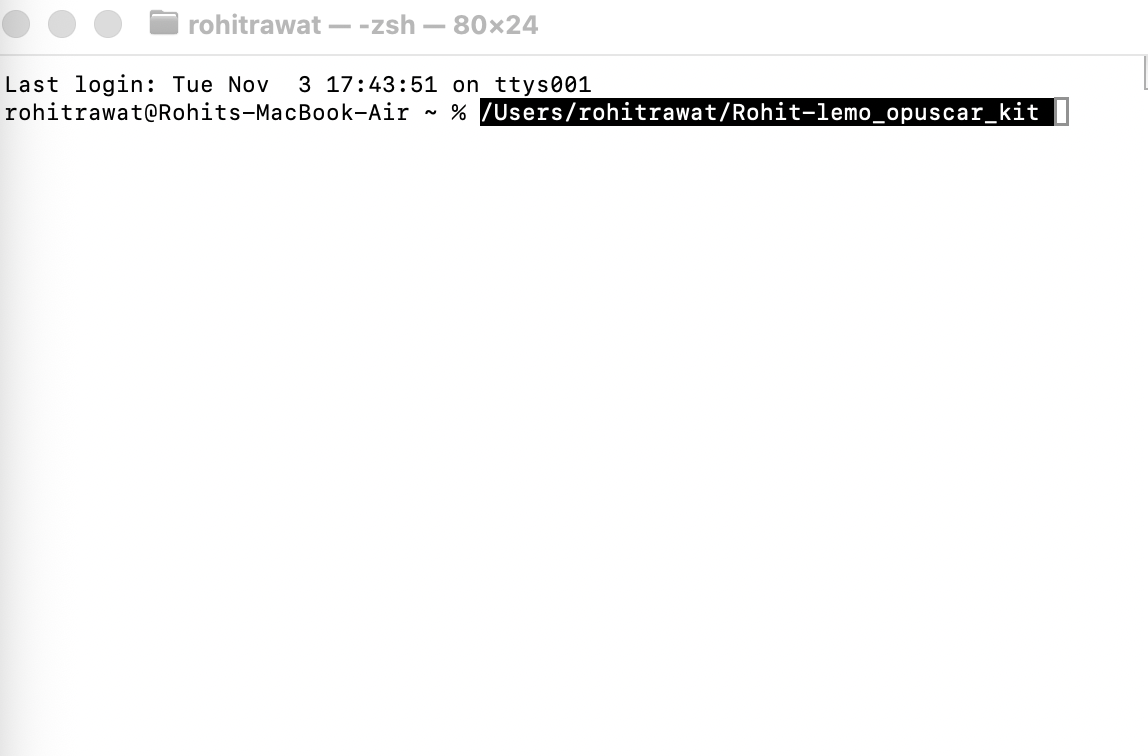
Mac: press Cmd + Space, type Terminal, press Enter. Type
cdand a space, drag the kit folder into the window, then press Enter.Windows: right-click the kit folder and choose Open in Terminal.
Step 4
Start Claude
Type
claudeand press Enter. When it asks, choose Yes, I trust this folder. That lets Claude work with the files in this kit.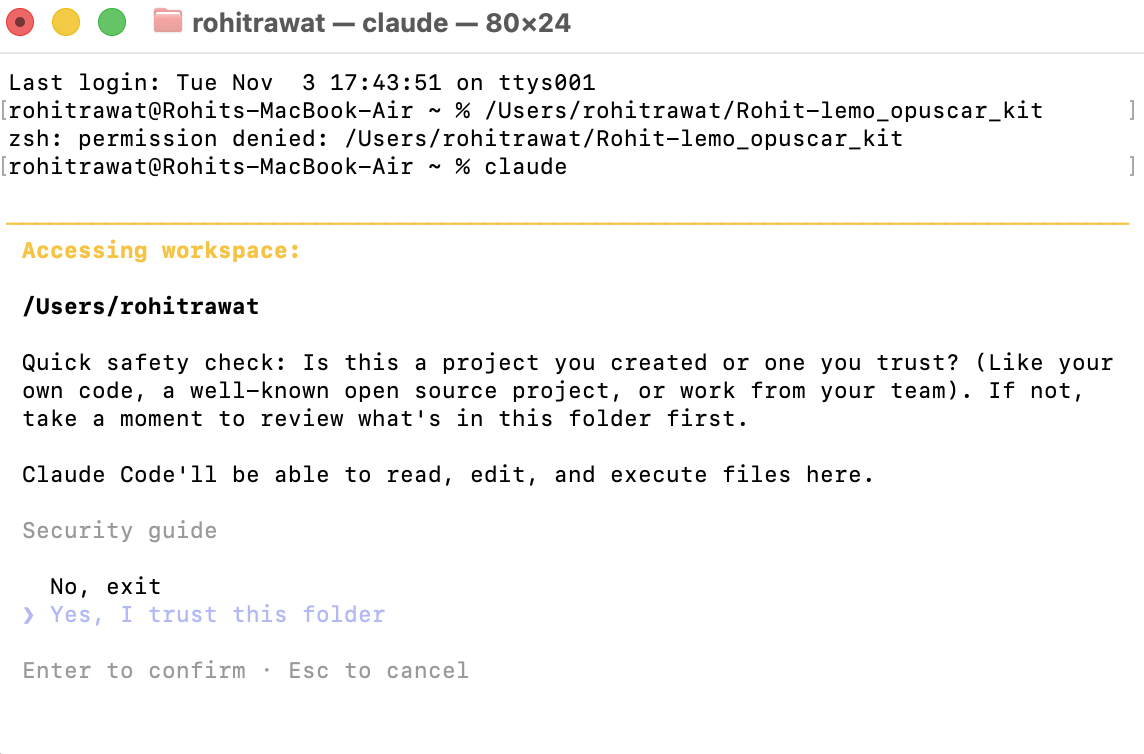
Step 5
Let Claude set itself up
Paste this and press Enter. If it asks permission to install something, say yes.
PromptCheck what this kit needs on my computer and install anything missing.
Step 6
Make your first film
Paste this. Claude tells you where the video is saved, in the films folder.
PromptMake a 10-second film in the watercolour style that shows the line 'Made with Claude'.
Good to know
- Start with 10-second clips. Longer films, and 3D ones, take more time and more of your Claude usage.
- Not sure how long something will take? Ask Claude: "Roughly how long will this take?"
- Seeing
command not found: claude? Claude Code is not installed yet, or you need to close Terminal and open it again.
The prompts I used
Every one of these starts from the same rules: vertical 1080x1920, 30 fps, music and sound effects, no voice, no emojis, no extra overlays, -14 LUFS. I always ask for 2 preview stills before the full render.
Flight path, 2.8 seconds
Use lemo-opuscar, style satellite-briefing. A 2.8 s vertical clip: my face
badge (cut out from my photo <path>, in a circle) rides a plane icon along
the great-circle range line from Delhi (DEL) to New York (JFK) over NASA
Blue Marble imagery. Lock-on reticle on Delhi, the line grows with ticks
every 1000 km, the camera follows the tip, then locks on New York and the
reading lands: 11,744 km, 16h 30m (source: Air India route page; put it in
FACTS.md). Credit "IMAGERY NASA BLUE MARBLE" in a corner. Show me 2 stills
first.
3D map of a state, 2.8 seconds
lemo-opuscar, satellite-briefing. 2.8 s vertical: start over all of India in
true colour, dive and tilt into an oblique 3D view of the Himalaya, a reticle
locks on, then trace the real Uttarakhand border from Natural Earth admin-1
(10m) and make it glow amber with a light fill. Small "UTTARAKHAND" label.
Fetch a higher-resolution NASA GIBS Blue Marble plate for 72-86E / 24-34N.
Draw no other borders. Credit imagery and boundary. Stills first.
Poster-style parade, 2.8 seconds
lemo-opuscar, silkscreen-poster, drawn in code with silk.js. 2.8 s vertical:
one-point perspective down Kartavya Path to India Gate (correct proportions:
42 m arch). A 6x7 contingent marches toward the gate in step at 120 bpm (back
view, rifles at the slope, saffron turbans, white cross-belts), with tricolour
flags waving along the lawns. A squeegee pull prints the saffron ink in the
first beat; slow push-in. Six inks plus paper, no insignia. Brass-band quick
march with boots on each beat. Stills first.
Risograph infographic, 2.8 seconds
lemo-opuscar, risograph, 3 plates (blue, saffron, green), 1080x1920. 2.8 s: a
stylised caricature of a speaker at a podium, raised hand pumping on the beat;
a huge crowd of simple figures seen from behind cheering in a wave; two flags.
Saffron plate rolls in, green drops on beat 1; push in. Not photoreal, no
speech or quote. Dhol-like groove, brass stab, crowd roar. Stills first.
Stitching the clips into one reel
This one does not re-render anything. It composites the mp4s you already have, which is why it is cheap.
Merge the existing mp4s in /kit_clips into one 1080x1920 30 fps reel. Don't
re-render the clips. Top: a dark chat UI (no vendor logo); the slash prompt
types only in the top bubble in about 0.6 s with key taps, then the clip plays
in a rounded card below it (about 2.65 s each). Bottom: a small caption on a
black gradient that never covers the card. End with a CTA card, then append my
end card endcard.mp4 without distortion. One continuous music bed with each
clip's own audio ducked under it, -14 LUFS. Give me 2 preview PNGs and a draft
mp4.
Getting good results without burning your plan
This is the part I wish I had known on day one. The rendering is cheap. The writing and the back and forth are what cost you.
- Keep clips to 2 to 4 seconds. Mine rendered in 5 to 25 seconds for 84 frames
- One style per clip, named exactly as the style index spells it
- Give the facts, sources and file paths up front. Every question the agent has to ask you back costs another round
- Ask for 2 to 4 stills before the full video. Fix the composition on stills, then render once
- Put all your fixes in one message and ask for one rebuild, instead of a fix at a time
- Reuse renders. Merges, captions and end cards should composite the existing mp4s, not re-render the clips
- Say what you do not want: no emojis, no logos, no voice. Cheaper than removing it after
- Skip the optional checks on tiny clips. Keep the freeze check and the loudness check
Claude Code or Grok Bot
Same kit, same output. The difference is where the work runs and which plan pays for it.
Claude Code runs on your own laptop, with your Node, ffmpeg and Python. Your files stay with you. It counts against your Claude plan, and your laptop has to stay awake while it renders. The kit was built for this one.
Grok Bot works on its own cloud computer by default. It copies the kit there, renders there, and shows you previews in chat. Nothing gets installed on your laptop and it keeps going while your laptop is off. With your approval it can also run commands on your own machine, asking each time.
Questions people ask
How long does a clip take?
A 2 to 4 second clip renders in seconds to under a minute. The writing and checking take a few minutes. A full 45 to 75 second film takes an agent 30 to 60 minutes, by the kit's own README.
Vertical or horizontal?
The default is 1920x1080 at 24 fps. Ask for 1080x1920 at 30 fps and you get Reels and Shorts.
Can it show real people?
We drew a stylised, non-photoreal caricature with no invented quotes. Check consent and context before you publish anything with a real person in it.
What about logos and brands?
The kit's own direction file says no existing brands, logos or works unless you own them or have the right to use them. Use fictional stand-ins instead. That is why we left out party emblems and app logos.
Is the music licensed?
Yes. The instruments are CC0 sample libraries and the sound effects are synthesised in code, so you can use them in your own films. Credits go in each film's CREDITS file.
Where do the maps come from?
NASA Blue Marble and Natural Earth, both public domain. Credit them on screen.
Something looks off. How do I fix it?
Ask for stills at the exact times, describe every fix in one message, then rebuild once.
How do I rebuild or tweak a clip?
Edit the film file or the mix file in your project folder, then run that project's build script.
Can I make my own style?
Yes. Change one of the library styles or start from a picture you like. Your style is saved outside the library, so updates never overwrite it.
Is there a watermark?
No. Films you make outside the styles folder carry no credit or watermark.
Want more like this? Follow me on Instagram
Need help setting this up? Talk to me
Video
Talking Video Kit
Edit talking-head reels with one prompt in Claude Code. Words, cards, 3D rings and props sit behind your head, track your face, and stay out of the Reels UI.
What this kit is
Drop in a clip of yourself talking. Ask for an effect in plain English. The kit cuts you out of the background, works out where your face is in every frame, and renders pro motion graphics around you: a giant word rising from behind your shoulders, a glass card with your numbers counting up, your reels orbiting your head in 3D, a tier list building under your chin.
None of it is AI-generated video. Your footage stays your footage. The effects are drawn in code over a clean cut-out of you, so a render is exact, repeatable, and you can change one line and run it again.
22 effects ship with it, in five groups: proof and numbers, type and captions, camera and look, 3D and depth, and openers. There is also a 2.5-second chat-style intro you can put in front of any of them.
The full effect list, with a preview of each one, is on the original repo: github.com/aaksa/facecammaxxing
What you need
- Claude Code on a paid Claude plan (Pro or above)
- ffmpeg
- Python 3.10, 3.11 or 3.12 — not newer, the face tracking has no builds for newer ones yet
- Node 22 or newer
- Optional: Blender 3.6+, only if you want to model a brand new 3D prop. The ready-made props are already in the kit.
Mac or Linux only.
- On a Mac, you are good to go.
- On Windows, install WSL first and do everything inside it. It is one command and a restart: Microsoft's WSL guide. After that, Windows has an Ubuntu terminal and the kit runs there.
How to set it up (about 20 minutes, one time)
Each step has the Mac version and the Windows (WSL) version. Follow the one for your computer.
-
Step 1
Unzip the kit
Mac: double-click the zip you downloaded. You get a folder called
facecammaxxing. Drag it out of Downloads into your home folder, so the path is short.Windows (WSL): unzip it in Windows as usual, then copy the folder into Linux. Renders are much slower if the kit sits on the Windows side. In the Ubuntu terminal:
Windows (WSL)cp -r /mnt/c/Users/YOUR_WINDOWS_NAME/Downloads/facecammaxxing ~/
Swap
YOUR_WINDOWS_NAMEfor your Windows user name.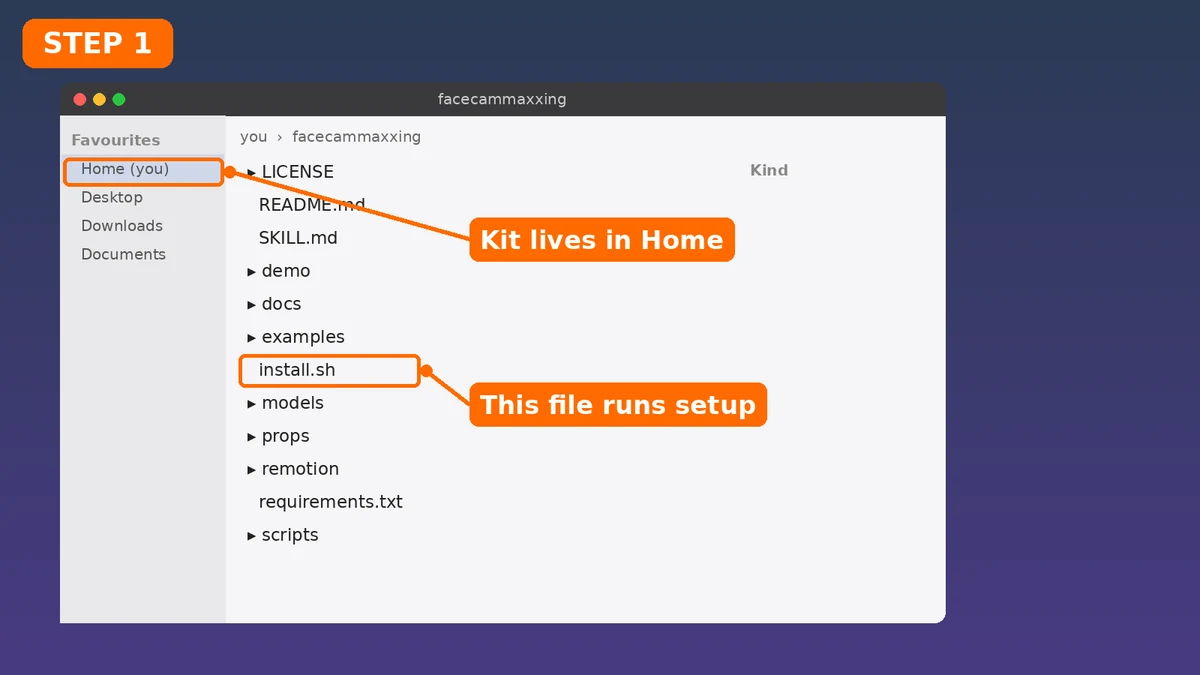
-
Step 2
Open a terminal
Mac: press Cmd + Space, type
Terminal, press Enter.Windows (WSL): press the Windows key, type
Ubuntu, press Enter. That is your Linux terminal. Do not use PowerShell or Command Prompt for this kit.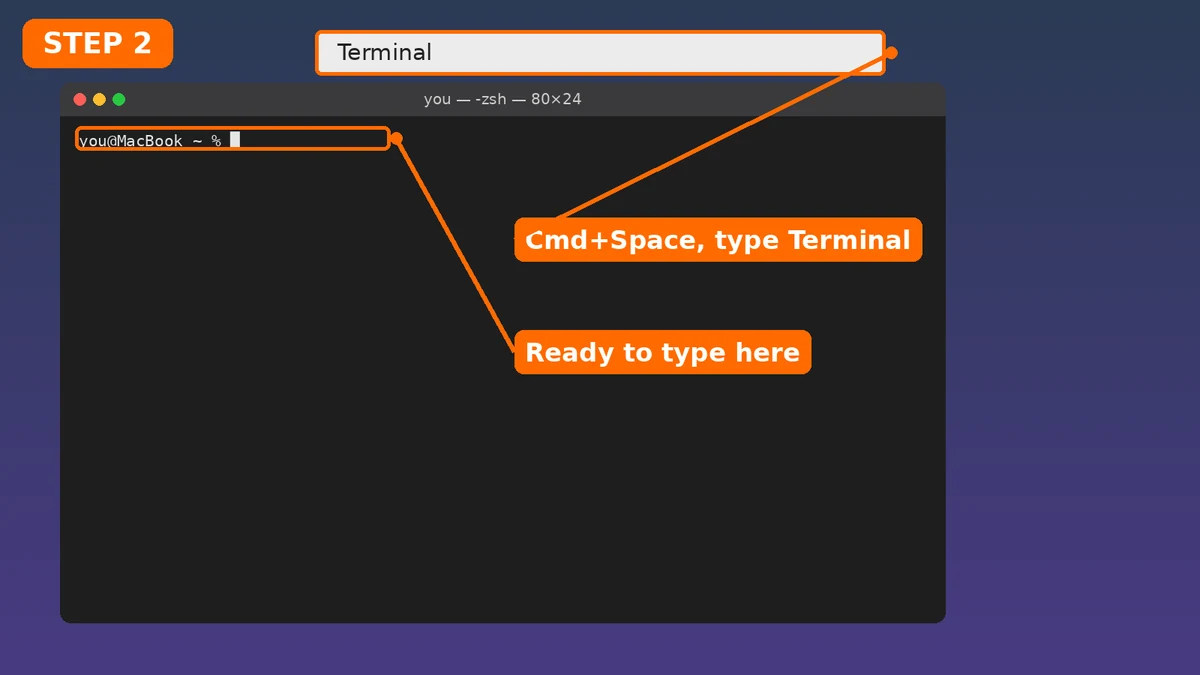
-
Step 3
Install the four things it needs
Paste the block for your computer and press Enter. It will ask for your password. This is the longest step; leave it running.
Mac (Homebrew)brew install ffmpeg python@3.11 node@22
No Homebrew yet? Install it first from brew.sh, then run the line above.
Mac:
brew install node@22if the installer saysNEED_NODE.Windows (WSL) / Linuxsudo apt update sudo apt install -y ffmpeg python3 python3-venv curl -fsSL https://deb.nodesource.com/setup_22.x | sudo -E bash - sudo apt install -y nodejs
Then install Claude Code itself:
Mac and WSLcurl -fsSL https://claude.ai/install.sh | bash
To check it worked, type
claude --versionand press Enter. Full guide: code.claude.com/docs/en/quickstart.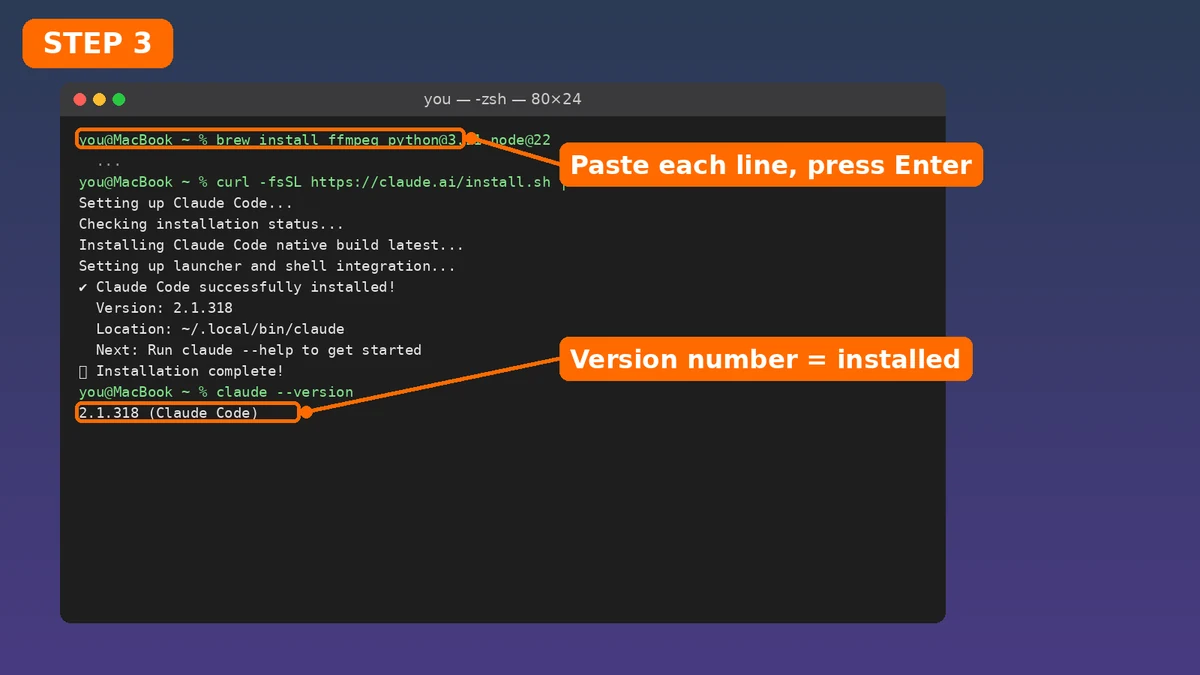
-
Step 4
Go into the kit folder and run the installer
Type
cdand a space, then drag the kit folder into the terminal window and press Enter. Or type the path yourself:Mac and WSLcd ~/facecammaxxing
Now run the installer. This is the one command that does everything: it links the kit into Claude Code as a skill, builds its Python environment, downloads the three face and cut-out models, and installs the renderer.
Mac and WSLbash install.sh
Wait until it prints
READY. First run takes a few minutes because of the downloads. If it stops and saysNEED_FFMPEG,NEED_PYTHONorNEED_NODE, go back to Step 3 for that one thing and runbash install.shagain. It is safe to run as many times as you like.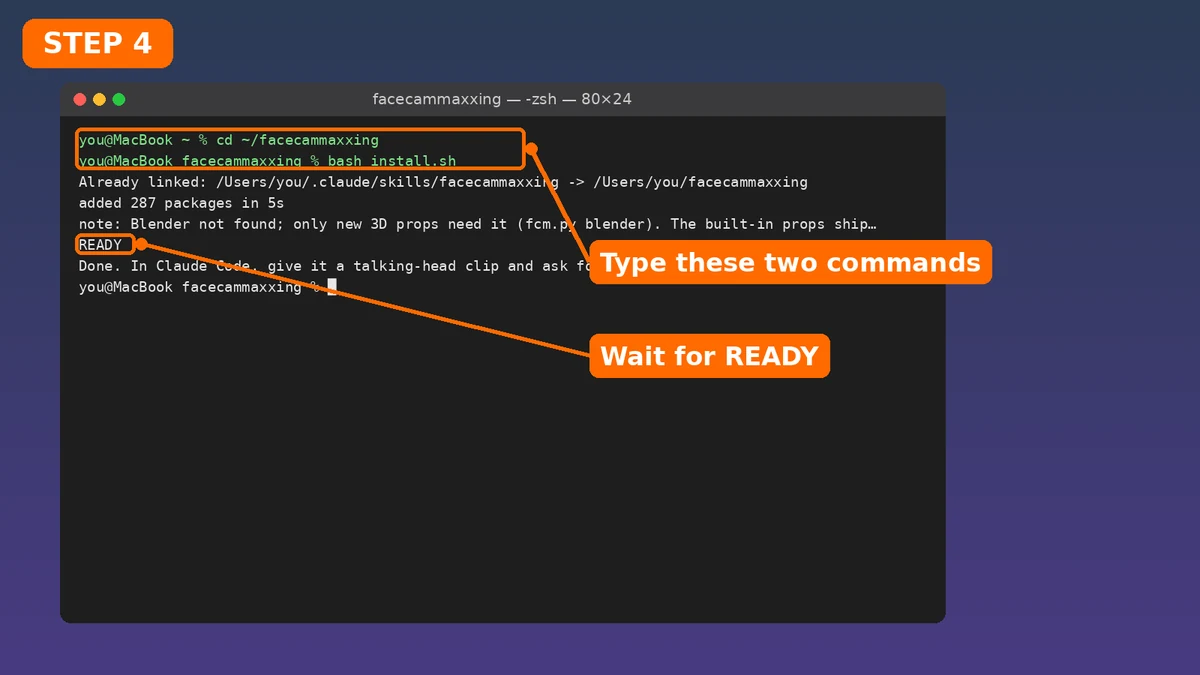
-
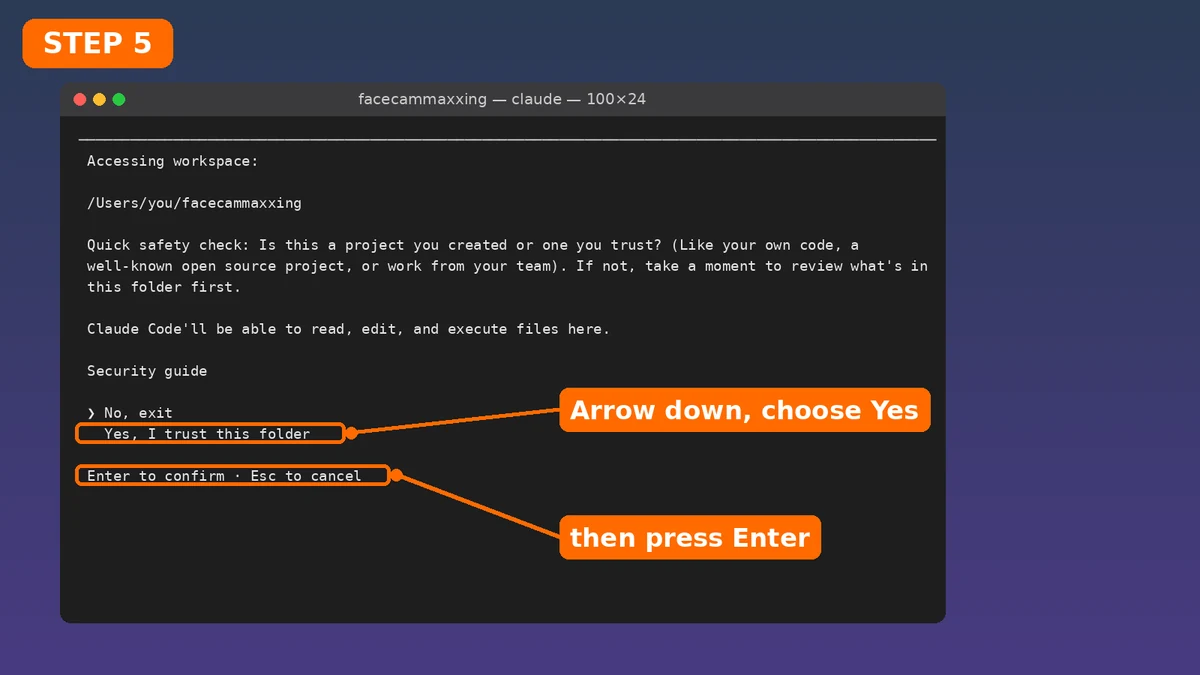
Step 5
Open Claude Code
Still in the same folder, type
claudeand press Enter. Press the down arrow to Yes, I trust this folder, then press Enter.Mac and WSLclaude
That is the setup done. From here you only ever talk to it in plain English.
Your first prompt
Before you render anything, ask it this. It will tell you what it can and cannot do with your clip, and suggest effects that suit it.
What can this kit do? What can't it do? Show me the effects you'd suggest for a 5-second talking-head clip.
The five prompts I used
The five reels I made with it, written out as prompts you can paste. Change the words, the numbers and the file name to yours. Every one of them says full quality at the end, because the kit renders a fast draft otherwise.
1. Numbers rising behind my head
Use my clip clip.mp4. Put a frosted glass card beside my head with the
number 12,480 counting up from zero, labelled "followers this month", and
an orange line that draws itself across the card. Keep the card clear of
my face and out of the bottom third where the Reels buttons sit. Vertical
1080x1920. Show me a still first, then render it at full quality.
2. Word-by-word captions
Use my clip clip.mp4. Add captions for what I'm saying, appearing word by
word in time with my voice, two lines, big and bold. Tuck the top line
behind my head so it looks like I'm in front of the text. Keep every word
above the bottom third. Vertical 1080x1920, full quality.
3. Cinematic push-in
Use my clip clip.mp4. Make it look cinematic: a slow push in on my face
across the whole clip, the room going soft behind me, and a warm film
grade wiped in over the flat footage. One hard punch-in on the word
"everything". No text, no cards. Vertical 1080x1920, full quality.
4. My reels orbiting my head in 3D
Use my clip clip.mp4. Take the four videos in the reels folder and orbit
them around my head in 3D, passing behind me and then in front, one slow
full turn across the clip. Keep them away from my face. Vertical
1080x1920, full quality.
5. Tier list under my chin
Use my clip clip.mp4. Build an S to D tier list under my chin, one row
landing at a time: S "Claude Code", A "Cursor", B "Copilot", C "autocomplete",
D "doing it by hand". Keep the rows below my mouth and above the bottom
third. Vertical 1080x1920, full quality.
Tips that make the difference
- Shoot against a plain background. The whole thing rests on cutting you out cleanly. A plain wall gives you sharp edges; a busy shelf behind you gives you fuzzy hair.
- Keep the clip between 3 and 10 seconds. Short clips track and render in a minute or two. Long ones eat time and your Claude usage for no extra effect.
- Always say "full quality" when you are happy. Otherwise you keep getting the quick draft.
- Ask for a still first. Fix the layout on a still, then render once, instead of rendering five times.
- Say where things should not go: not over my face, not in the bottom third. Instagram and YouTube put their buttons there.
- Hold still-ish. Fast hand waves across your face are the one thing that trips up the cut-out.
- Put all your changes in one message and ask for one re-render.
Questions people ask
Does this make an AI video of me?
No. It uses your own footage. Nothing about your face is generated. The effects are drawn in code and composited around a cut-out of you, which is why your eyes, mouth and voice stay exactly as you filmed them.
Will it work on Windows?
Only inside WSL. Install WSL from Microsoft's guide, open Ubuntu, and follow the Windows (WSL) lines in each step. PowerShell on its own will not work.
How long does one render take?
A few minutes for a 5-second clip on a recent laptop: a tracking pass over the clip, then the render. The 3D effects take longest. Ask it "roughly how long will this take?" before you start.
Does my footage leave my computer?
No. Tracking and rendering both happen on your own machine. Only what you type to Claude goes to Claude.
It said NEED_FFMPEG, NEED_PYTHON or NEED_NODE.
That is the installer telling you one of the four things from Step 3 is missing. Install that one, then run bash install.sh again. Running it again is always safe.
My hair looks soft around the edges.
The best cut-out model did not download, so it fell back to a simpler one. Run bash install.sh again on a better connection. A plain background helps a lot too.
Can I use my own 3D prop?
Yes, and the ready-made props are already in the kit. Only a brand new prop needs Blender 3.6 or newer installed.
Is there a watermark?
No. The renders are yours, no badge, no credit burned in.
Can I combine two effects?
Yes. Ask for both in one sentence, in the order they should happen. The kit plans it beat by beat, like a reel director.
Credits: built on facecammaxxing by @aaksa, based on claude-video-effects by @vibha.in.progress. Both MIT licensed, and the original notice is kept in the kit.
Want more like this? Follow me on Instagram — @rawatagentic
Need help setting this up? Talk to me